You are viewing the RapidMiner Radoop documentation for version 9.0 -Check here for latest version
Distribution-specific Notes
For certain Hadoop distributions, you may need to complete additional client-side configuration using theConnection Settingsdialog. Cluster modifications usually need an SSH connection or access to a Hadoop management tool (for example, Cloudera Manager or Ambari). You may need to contact your Hadoop administrator to perform the cluster configuration steps.
Connecting to a CDH 5.13 Quickstart VM
Start and configure the Quickstart VM
Download the Cloudera Quickstart VM (version 5.13) from theCloudera website.
Import the OVA packaged VM to your virtualization environment (Virtualbox and VMware are covered in this guide).
It is strongly recommended to upgrade to Java 1.8 on the single-node cluster provided by the VM. Otherwise, the execution ofSingle Process PushdownandApply Modeloperators will fail.
You can take the following steps only if no clusters or Cloudera management services have been started yet. For the full upgrading process, readCloudera’s guide.
Upgrading to Java 1.8:
- Start the VM.
- Download and unzip JDK 1.8 – preferrablyjdk1.8.0_60– to
/usr/java/jdk1.8.0_60. Add the following configuration line to
/etc/default/cloudera-scm-server:export JAVA_HOME=/usr/java/jdk1.8.0_60- LaunchCloudera Express(or Enterprise trial version).
Open a web browser, and log in toCloudera Manager(
quickstart.cloudera:7180) usingcloudera/clouderaas credentials. Navigate toHosts/quickstart.cloudera/Configuration.InJava Home Directoryfield, enter/usr/java/jdk1.8.0_60- On the home page ofCloudera Manager, (re)start theCloudera QuickStartcluster andCloudera Management Serviceas well.
If you are using Virtualbox, make sure that the VM is shut down, and set the type of the primary network adapter fromNATtoHost-only.VM将work only with this setting in a Virtualbox environment.
Start the VM and wait for the boot to complete. A browser with some basic information will appear.
Edit yourlocal
hostsfile (on your host operating system, not inside the VM) and add the following line (replacequickstart.cloudera
Setup the connection in RapidMiner Studio
Click on
 New Connectionbutton and choose
 Add Connection Manually
SetHadoop usernameto
hive.(As an alternative, you can setbothHadoop usernameandUsernameonHivetab to your own user.)Add
quickstart.clouderaasNameNode AddressAdd
quickstart.clouderaasResource Manager AddressAdd
quickstart.clouderaasHive Server AddressSelect Cloudera Hadoop (CDH5) asHadoop version
Add the following entries to theAdvanced Hadoop Parameters:
Key Value dfs.client.use.datanode.hostnametrue(This parameter is not required when using theImport Hadoop Configuration Filesoption):
Key Value mapreduce.map.java.opts-Xmx256mSelect the appropriateSpark Version(this should beSpark 1.6if you want use the VM’s built-in Spark assembly jar) and set theAssembly Jar Locationto the following value:
local:///usr/lib/spark/lib/spark-assembly.jar
Connecting to a 2.6.5+ Sandbox VM
Start and configure the Sandbox VM
Download the Hortonworks Sandbox VM for VirtualBox (version 2.6.5+) from theHortonworks website.
Import the OVA packaged VM to your virtualization environment (Virtualbox is covered in this guide).
Start the VM. After powering it on, you have to select the first option from the boot menu, then wait for the boot to complete.
Log in to the VM. You can do this by switching to the login console (Alt+F5), or even better via SSH on localhost port
2122.It is important to note that there are 2 exposed SSH ports on the VM, one belongs to the VM itself (2122), while the other (2222) belongs to a Docker container running inside the VM. The username isroot, the password ishadoopfor both.- Edit the
/sandbox/proxy/generate-proxy-deploy-script.shby include the following ports in thetcpPortsHDParray 50010, 10020, 8030, 8025.vi /sandbox/proxy/generate-proxy-deploy-script.shFind
tcpPortsHDPvariable, leaving the other values in place, add to the hashtable assignment:[50010]=50010 [10020]=10020 [8030]=8030 [8025]=8025
- Run the editedgenerate-proxy-deploy-script.shvia
./sandbox/proxy/generate-proxy-deploy-script.sh- This will re-create the/sandbox/proxy/proxy-deploy.shscript along with config files in/sandbox/proxy/conf.dand/sandbox/proxy/conf.stream.d, thus exposing the additional ports added to the
tcpPortsHDPhashtable in previous step.
- This will re-create the/sandbox/proxy/proxy-deploy.shscript along with config files in/sandbox/proxy/conf.dand/sandbox/proxy/conf.stream.d, thus exposing the additional ports added to the
- Run the/sandbox/proxy/proxy-deploy.shscript via
./sandbox/proxy/proxy-deploy.sh- Running the
docker pscommand, will show an instance namedsandbox-proxyand the ports it has exposed. The inserted values to thetcpPortsHDPhashtable should be shown in the output, looking like0.0.0.0:10020->10020/tcp.
- Running the
These changes only made sure that the referenced ports of the Docker container are accessible on the respective ports of the VM. Since the network adapter of the VM is attached to NAT, these ports are not accessible from your local machine. To make them available you have to add the port forwarding rules listed below to the VM. In VirtualBox you can find these settings underMachine/设置/Network/Adapter 1/Advanced/Port Forwarding.
Name Protocol Host Ip Host Port Guest Ip Guest Port datanode TCP 127.0.0.1 50010 50010 jobhistory TCP 127.0.0.1 10020 10020 resourcescheduler TCP 127.0.0.1 8030 8030 resourcetracker TCP 127.0.0.1 8025 8025 Edit yourlocal
hostsfile (on your host operating system, not inside the VM), addsandbox.hortonworks.comandsandbox-hdp.hortonworks.comto your localhost entry. At the end it should look something like this:127.0.0.1 localhost sandbox.hortonworks.com sandbox-hdp.hortonworks.comReset Ambari access. Use an SSH client to login tolocalhost as root, this time using port
2222!(For example, on OS X or Linux, use the commandssh root@localhost -p 2222, password:hadoop)- (At first login you have to set a new root password, do it and remember it.)
- Run
ambari-admin-password-resetas root user. - Provide a new admin password for Ambari.
- Run
ambari-agent restart.
Open the Ambari website:
http://sandbox.hortonworks.com:8080- Login with
adminand the password you chose in the previous step. - Navigate to theYARN/Configs/Memoryconfiguration page.
- Edit theMemory NodeSetting to at least 7 GB and click Override.
- User will be prompted to create a new “YARN Configuration Group”, enter a new name.
- On the “Save Configuration Group” dialog, click theManage Hostsbutton.
- On the “Manage YARN Configuration Groups page” take the node in the “Default” group and add the node into the group created in the “YARN Configuration Group” name step.
- “Warning” Dialog will open requesting adding notes click theSavebutton.
- “Dependent Configurations” dialog will open with Ambari providing recommendations to modify some related properties automatically. If so, untick
tez.runtime.io.sort.mbto keep its original value. Click theOkbutton.- Ambari may open a “Configurations” page suggesting stuff. Review accordingly, but this is out of the scope of this document, so just clickProceed Anyway.
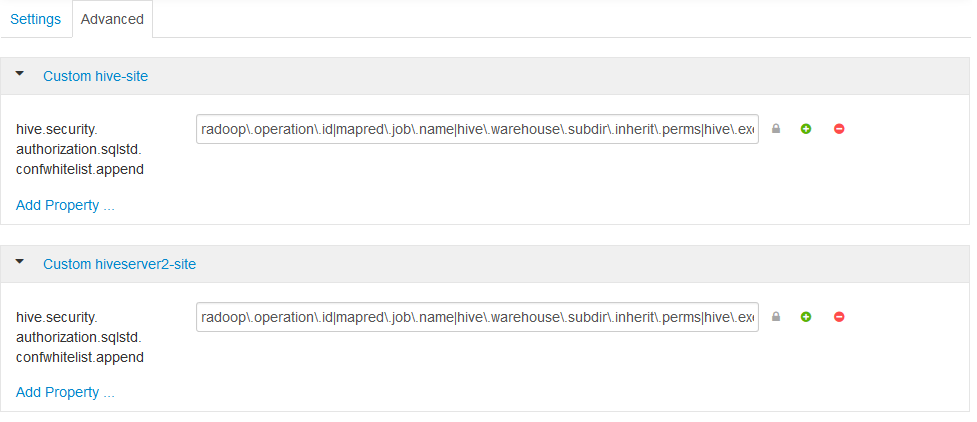
- Navigate to theHive/Configs/Advancedconfiguration page.
- In theCustom hive-siteandCustom hiveserver2-sitesections. The
hive.security.authorization.sqlstd.confwhitelist.appendneeds to be added via theAdd Property…and be set to the following (it must not contain whitespaces):radoop\.operation\.id|mapred\.job\.name|hive\.warehouse\.subdir\.inherit\.perms|hive\.exec\.max\.dynamic\.partitions|hive\.exec\.max\.dynamic\.partitions\.pernode|spark\.app\.name
- Save the configuration and restart all affected services.
- Login with
For enabling Spark operators, you should copy the assembly JAR to the HDFS on the Sandbox machine. Use an SSH client to login tosandbox.hortonworks.com as root using port 2222.Copy the jar to the HDFS:
sudo -u hdfs hadoop fs -mkdir -p /user/spark sudo -u hdfs hadoop fs -put /usr/hdp/current/spark-client/lib/spark-assembly-*.jar /user/spark/spark-assembly.jarIf you know the exact name and location of the assembly jar on the VM, this step can be skipped.
Setup the connection in RapidMiner Studio
Click on
New Connectionbutton and choose Import from Cluster Manager直接从选项来创建连接conifguration retrieved from Ambari.
- On theImport Connection from Cluster Managerdialog enter
- Cluster Manager URL:
http://sandbox-hdp.hortonworks.com:8080 - Username:
admin - Password: password used in Reset Amabari step.
- Cluster Manager URL:
ClickImport Configuration
- Hadoop Configuration Import对话框will open up
- If successful clickNextbutton andConnection Settings对话框will open.
- If failed clickBackbutton and review above steps and logs to solve issue(s).
OnConnection SettingsDialog
Connection Namecan stay defaulted or be changed by user.
- Globaltab
- Hadoop Versionshould be
Hortonworks HDP 2.x - SetHadoop usernameto
hadoop.
- Hadoop Versionshould be
- Hadooptab
- NameNode Addressshould be
sandbox-hdp.hortonworks.com - NameNode Portshould be
8020 - Resource Manager Addressshould be
sandbox-hdp.hortonworks.com - Resource Manager Portshould be
8032 - JobHistory Server Addressshould be
sandbox-hdp.hortonworks.com - JobHistory Server Portshould be
10020 Advanced Hadoop Parametersadd the following parameters:
Key Value dfs.client.use.datanode.hostnametrue(This parameter is not required when using theImport Hadoop Configuration Filesoption):
Key Value mapreduce.map.java.opts-Xmx256m
- NameNode Addressshould be
- Sparktab
- Spark Versionselect
Spark 1.6(Spark 1.6 is default Spark version in the system, user can utilize others by installing there own and adjusting settings for Spark on this tab.) - UncheckUse default Spark path
- ChangeAssembly Jar Locationto
hdfs:///user/spark/spark-assembly.jaror provide the local path of the Jar with thelocal://prefix.
- ChangeAssembly Jar Locationto
- Spark Versionselect
- Hivetab
- Hive Versionshould be
HiveServer2 (Hive 0.13 or newer) - Hive High Availabilityshould be checked
- ZooKeeper Quorumshould be
sandbox-hdp.hortonworks.com:2181 - ZooKeeper Namespaceshould be
hiverserver2 - Database Nameshould be
default - JDBC URL Postfixshould be empty
- Usernameshould be
hive - Passwordshould be empty
- UDFs are installed manuallyandUse custom database for UDFsare both unchecked
- Hive on Spark/Tez container reuseshould be checked
- Hive Versionshould be
ClickOKbutton, theConnection Settings对话框will close
- User can test the connection created above onnManage Radoop Connectionspage select the connection created and clicking theQuick Testand
 Full Test…buttons.
If errors occur durning testing confirm that necessary Components are started correctly athttp://localhost:8080/#/main/hosts/sandbox-hdp.hortonworks.com/summary.
It is highly recommended to use![]() New Connection/
New Connection/![]() Import from Cluster Manager直接从选项来创建连接configuration retrieved from Cloudera Manager. If you do not have a Cloudera Manager account that has access to the configuration, an administrator should be able toDownload Client Configuration.Using the client configuration files, choose
Import from Cluster Manager直接从选项来创建连接configuration retrieved from Cloudera Manager. If you do not have a Cloudera Manager account that has access to the configuration, an administrator should be able toDownload Client Configuration.Using the client configuration files, choose![]() New Connection/
New Connection/![]() Import Hadoop Configuration Filesto create the connection from those files.
Import Hadoop Configuration Filesto create the connection from those files.
If security is enabled on the cluster, make sure you checkConfiguring Apache Sentry authorizationsection of theHadoop Security一章。
Configuring Spark
If you are using Spark 1.6 version you may need to selectSpark 1.6 (CDH)for more recent Cloudera Hadoop releases andSpark 1.6for older releases. Select any of them and then run theSpark job test(enable only this test in![]() Full Test…/
Full Test…/![]() Customize…) that automatically detects the proper version for you. Please choose the setting that this test recommends.
Customize…) that automatically detects the proper version for you. Please choose the setting that this test recommends.
Using any other Spark version should be straightforward.
The following describes setup for HDP 2.2.6, 2.3.0, 2.3.2, 2.3.4, 2.4.0 and 2.5.0. Setup for other HDP versions should be similar.
Configuring the cluster
If there are restrictions on Hive commands on your cluster (for example,SQL Standard Based Hive Authorizationis enabled on it), then the change of certain properties through HiveServer2 must be explicitly enabled. This is required if you get the following error message when running a Full Test in RapidMiner Radoop:Cannot modify radoop.operation.id at runtime.In this case a property must be added on the Ambari interface to resolve this issue.
- Login to the Ambari interface.
- Navigate to theHive/Configs/Advancedconfiguration page
- Add the
hive.security.authorization.sqlstd.confwhitelist.appendsetting as a new property to bothCustom hive-siteandCustom hiveserver2-site.值应该以下(它必须包含no whitespaces):radoop\.operation\.id|mapred\.job\.name|hive\.warehouse\.subdir\.inherit\.perms|hive\.exec\.max\.dynamic\.partitions|hive\.exec\.max\.dynamic\.partitions\.pernode|spark\.app\.name

- Save the configuration and restart the proposed services.
For a more detailed explanation, see theHadoop securitysection.
To enable Spark operators in RapidMiner Radoop, make the following changes in theConnection Settingsdialog:
Select the appropriateSpark Versionoption in theSpark Settings.If Spark is installed with Ambari, theSpark Versiondepends on the cluster’s HDP version.
HDP version Spark assembly JAR location 2.6.x Spark 1.6 or Spark 2.1 / Spark 2.2 2.5.x Spark 1.6 or Spark 2.0 2.4.x Spark 1.6 2.3.4 Spark 1.5 2.3.2 Spark 1.4 or below 2.3.0 Spark 1.4 or below 2.2.6 Spark 1.4 or below Set theAssembly Jar Location/Spark Archive pathto point to the Spark location on your cluster. The following table contains the default local locations depending on your HDP version. Refer to your Hadoop administrator if the specified path does not seem to work.
HDP version Spark 1.x assembly JAR location Spark 2.x archive path 2.6.x local:///usr/hdp/current/spark-client/lib/spark-hdp-assembly.jarlocal:///usr/hdp/current/spark2-client/jars/2.5.0 local:///usr/hdp/current/spark-client/lib/spark-hdp-assembly.jar2.4.2 local:///usr/hdp/current/spark-client/lib/spark-assembly.jar2.4.0 local:///usr/hdp/current/spark-client/lib/spark-assembly-1.6.0.2.4.0.0-169-hadoop2.7.1.2.4.0.0-169.jar2.3.4 local:///usr/hdp/current/spark-client/lib/spark-assembly-1.5.2.2.3.4.0-3485-hadoop2.7.1.2.3.4.0-3485.jar2.3.2 local:///usr/hdp/current/spark-client/lib/spark-assembly-1.4.1.2.3.2.0-2950-hadoop2.7.1.2.3.2.0-2950.jar2.3.0 local:///usr/hdp/current/spark-client/lib/spark-assembly-1.3.1.2.3.0.0-2557-hadoop2.7.1.2.3.0.0-2557.jar2.2.6 local:///usr/hdp/current/spark-client/lib/spark-assembly-1.2.1.2.2.6.0-2800-hadoop2.6.0.2.2.6.0-2800.jar
Notes on security
If you receive a permission error during connection Full Test, verify that:
- The
/user/directory exists on the HDFS and is owned by. (If the Hadoop username setting is empty, the client OS username is used.) - The
has write privileges on /user/historydirectory on the HDFS.
SQL Standard Based Hive Authorization may require that the user running HiveServer2 owns the files and directories loaded into Hive. This can disrupt the normal operation of RapidMiner Radoop. In case of a permission error, consult your Hadoop administrator.
Connecting to an Azure HDInsight 3.6 cluster using Radoop Proxy
As of this writing RapidMiner Radoop supports 3.5 and 3.6 versions of Azure HDInsight, a cloud-based Hadoop service that is built upon Hortonworks Data Platform (HDP) distribution. If RapidMiner Radoop does not run inside the Azure network, there are a couple of options for the networking setup. A solution likeAzure ExpressRouteor a VPN can simplify the setup. However, if those options are not available, the HDInsight clusters can be accessed using Radoop Proxy, which coordinates all the communication between RapidMiner Studio and the cluster resources. Since this setup is the most complex, this guides assumes this scenario, feel free to skip steps that are not required because of an easier networking setup.
For a proper networking setup, a RapidMiner Server instance (withRadoop Proxyenabled) should be installed on an additional machine that is located in the same virtual network as the cluster nodes. The following guide provides the necessary steps for establishing a proxied connection to an HDInsight cluster.
Starting an HDInsight cluster
If you already have an HDInsight cluster running in the Azure network, skip these steps entirely.
Create a newVirtual networkfor all the network resources that will be created during cluster setup. The defaultAddress spaceandSubnet address rangemay be suitable for this purpose. Use the sameResource groupfor all resources that are created during the whole cluster setup procedure.
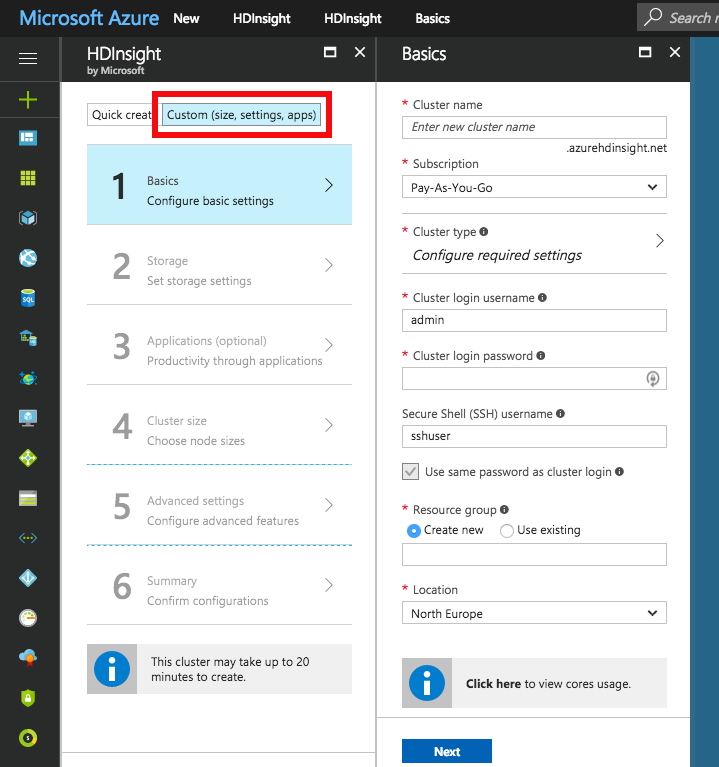
Use theCustom (size, settings, apps)option instead ofQuick createfor creating the cluster. ChooseSparkcluster type withLinuxoperating system, and the latest Spark version supported by Radoop, which isSpark 2.2.0 (HDI 3.6)as of this writing. Fill all the required login credential fields. Select the previously definedResource group.
Choose thePrimary storage typeof the cluster. You may specify additional storage accounts as well.
- Azure Storage: Provide a new or already existingStorage accountand aDefault containername. You may connect to as many Azure Storage accounts as needed.
- Data Lake Store: Provide aData Lake Store account.Make sure that the root path exists and the associated Service principal has adequate privileges for accessing the chosen Data Lake Store and path. Please note that a Service principal can be re-used for other cluster setups as well. For this purpose, it is recommended to save theCertificatefile and theCertificate passwordfor future reference. Once a Service principal is chosen, the access rights for any Data Lake Stores can be configured via this single Service principal object.
Configure theCluster sizeof your choice.
OnAdvanced settingstab, choose the previously createdVirtual networkandSubnet.
After getting through all the steps of the wizard, create the cluster. After it has started, please find the private IPs and private domain names of the master nodes. You will need to copy these to your local machine. This step is required because some domain name resolutions need to take place on the client (RapidMiner Studio) side. The easiest way to do this is by copying it from one of the cluster nodes. Navigate to the dashboard of your HDInsight cluster, and select theSSH + Cluster loginoption. Choose any item from theHostnameselector. On Linux and Mac systems you can use the ssh command appearing below the selector. On Windows systems you will have to extract the hostname and the username from the command, and usePuTTYto connect to the host. The password is the one you provided in step 2. Once you are connected, view the contents of the /etc/hosts file of the remote host, for example by issuing the following command:
cat /etc/hosts.Copy all the entries with long, generated hostnames. Paste them into thehostsfile of yourlocal machine, which is available at the following location:- For Windows systems: Windows\system32\drivers\etc\hosts
- For Linux and Mac systems: /etc/hosts

Starting RapidMiner Server and Radoop Proxy
Create a new RapidMiner Server virtual machine in Azure. For this you will need to select the“Create a resource”option and search the Marketplace for RapidMiner Server. Select theBYOLversion which best matches your Studio version. PressCreateand start configuring the virtual machine. Provide the Basic settings according to your taste, but make sure that you use the previously configuredResource groupand the sameLocationas for your cluster. ClickOk,然后选择至少一个虚拟机大小10GB of RAM. Configure optional features. It is essential that the sameVirtual networkandSubnetare selected in theNetworksettings as the ones used for the cluster. All other settings may remain unchanged. Check the summary, then clickCreate.
Once the VM is started, you still need to wait a few minutes for RapidMiner Server to start. The easiest way to validate this is to open (Public IP address of the VM):8080 in your browser. Once that page loads, you can log in withadminusername and the name of your VM in Azure as password. You will immediately be asked for a valid license key. A free license is perfectly fine for this purpose. If your license is accepted you can close this window, you will not need it anymore.
Setting up the connection in RapidMiner Studio
First, create a Radoop Proxy Connection for the newly installed Radoop Proxy (describedherein Step 1). The needed properties are:
| Field | Value |
|---|---|
| Radoop Proxy server host | Provide the IP address of the MySQL server instance. |
| Radoop Proxy server port | The value ofradoop_proxy_portin the used RapidMiner Server install configuration XML (1081by default). |
| RapidMiner Server username | admin(by default) |
| RapidMiner Server password | name of Azure proxy VM(by default) |
| Use SSL | false(by default) |
Forsetting up a new Radoop connectionto an Azure HDInsight 3.6 cluster, we strongly recommend to choose![]() Import from Cluster Manageroption, as it offers by far the easiest way to make the connection work correctly.Thissection describes the Cluster Manager import process. TheCluster Manager URLshould be the base URL of the Ambari interface web page (e.g.
Import from Cluster Manageroption, as it offers by far the easiest way to make the connection work correctly.Thissection describes the Cluster Manager import process. TheCluster Manager URLshould be the base URL of the Ambari interface web page (e.g.https://radoopcluster.azurehdinsight.net). You can easily access it by clickingAmbari Viewson the cluster dashboard.
After the connection is imported, most of the required settings are filled automatically. In most cases, only the following properties have to be provided manually:
| Field | Value |
|---|---|
| Advanced Hadoop Parameters | Disable the following properties:io.compression.codec.lzo.classandio.compression.codecs |
| Hive Server Address | This is only needed, if you do not use the ZooKeeper service discovery(Hive High Availabilityis unchecked). Can be found on Ambari interface (Hive / HiveServer2). In most cases, it is the same as theNameNode address. |
| Radoop Proxy Connection | The previously created Radoop Proxy Connection should be chosen. |
| Spark Version | Select the version matching the Spark installation on the cluster, which isSpark 2.2if you followed above steps for HDInsight install. |
| Spark Archive (or libs) path | ForSpark 2.2(with HDInsight 3.6), the default value is (local:///usr/hdp/current/spark2-client/jars). Unless using a different Spark version you are fine with leavingUse default Spark pathcheckbox selected. |
| Advanced Spark Parameter | Createspark.yarn.appMasterEnv.PYSPARK_PYTHONproperty with a value of/usr/bin/anaconda/bin/python. |
You will also need to configure your storage credentials, which is described by theStorage credentials setupsection. If you want to connect to a premium cluster you will need to follow the steps in theConnecting to a Premium clustersection. Once you completed these steps, you can clickOKon theConnection Settingsdialog, and save your connection.
It is essential that the RapidMiner Radoop client can resolve the hostnames of the master nodes. Follow the instructions ofStep 6of theStarting an HDInsight clusterto add these hostnames to your operating system’s hosts file.
Storage credentials setup
An HDInsight cluster can have more storage instances attached, which may even have different storage types (Azure StorageandData Lake Store). For accessing them, the related credentials must be provided inAdvanced Hadoop Parameterstable. The following sections clarify the type of credentials needed, and how they can be acquired.
It is essential that the credentials of theprimary storageare provided.
You may have multiple Azure Storages attached to your HDInsight cluster, provided that any additional storages were specified during cluster setup. All of these have access key(s) which can be found atAccess keystab on the storage dashboard. To enable access towards an Azure Storage, provide this key as anAdvanced Hadoop Parameter:
| Key | Value |
|---|---|
fs.azure.account.key. |
the storage access key |
As above mentioned, a singleActive Directory service principalobject can be attached to the cluster. This controls the access rights towards Data Lake Store(s). Obviously, only one Data Lake Store can take the role of the primary storage. In order to enable Radoop to access a Data Lake Store through this principal, the followingAdvanced Hadoop Parametershave to be specified:
| Key | Value |
|---|---|
dfs.adls.oauth2.access.token.provider.type |
ClientCredential |
dfs.adls.oauth2.refresh.url |
OAuth 2.0 Token Endpoint address |
dfs.adls.oauth2.client.id |
Service principal application ID |
dfs.adls.oauth2.credential |
Service principal access key |
You can acquire all of these values underAzure Active Directorydashboard (available at the service list of the main Azure Portal). ClickApp registrationson the dashboard, then look for the needed values as follows:
- ForOAuth 2.0 Token Endpoint address, go toEndpoints, and copy the value ofOAuth 2.0 Token Endpoint.
- OnApp registrationspage, choose the Service principal associated with your HDInsight cluster, and provide the value ofApplication IDasService principal application ID.
- ClickKeys.Generate a new key by entering a name and an expiry date, and replace the value ofService principal access keywith the generated password.
Finally, go to the HDInsight cluster main page, and clickData Lake Store accessin the menu. Provide the value ofService Principal Object IDasHadoop Username.

Connecting to a Premium cluster (having Kerberos enabled)
If you have set up or have a Premium HDInsight cluster (subscription required), some additional connection settings are required for Kerberos-based authentication.
- Configuring Kerberos authenticationsection describes general Kerberos-related settings.
- As for all Hortonworks distribution based clusters, you also have to apply a Hive setting (
hive.security.authorization.sqlstd.confwhitelist.append) described inthis section.Please note that a Hive service restart will be needed. - Westronglyadvise to useImport from Cluster Manageroption for creating a Radoop connection to the Kerberized cluster. The import process covers some necessary changes inAdvanced Hadoop Parametersthat are required for the connection to work as expected.
从另一个网络连接到EMR
RapidMiner Radoop supports connecting to an EMR cluster using SOCKS proxy, VPN orRadoop Proxy.The following steps will guide you, how to start and configure an EMR cluster to use with RapidMiner Radoop and how to setup the networking and the Radoop connection to connect to the cluster. The steps required for a VPN setup can be found in a separated collapse boxbelow.
Starting an EMR cluster
Skip these steps if you already have an EMR cluster running that has Java 8.
Use the advanced options for creating the cluster. Select EMR release4.4 or newer.Make sure thatHadoop,HiveandSparkare selected for installation.
Add the following configuration in order to configure Java 8:
[ { "Classification": "hadoop-env", "Configurations": [ { "Classification": "export", "Configurations": [], "Properties": { "JAVA_HOME": "/usr/lib/jvm/java-1.8.0" } } ], "Properties": {} }, { "Classification": "spark-env", "Configurations": [ { "Classification": "export", "Configurations": [], "Properties": { "JAVA_HOME": "/usr/lib/jvm/java-1.8.0" } } ], "Properties": {} } ]After getting through all the steps of the wizard, create the cluster. If it has been started, the private IPs and private domain names of the EC2 instances should be available.
Use the advanced options for creating the cluster. Choose EMR release4.4 or newer.Make sure thatHadoop,HiveandSparkare selected for installation.
Add the following configuration in order to configure Java 8:
[ { "Classification": "hadoop-env", "Configurations": [ { "Classification": "export", "Configurations": [], "Properties": { "JAVA_HOME": "/usr/lib/jvm/java-1.8.0" } } ], "Properties": {} }, { "Classification": "spark-env", "Configurations": [ { "Classification": "export", "Configurations": [], "Properties": { "JAVA_HOME": "/usr/lib/jvm/java-1.8.0" } } ], "Properties": {} } ]At the Hardware Configuration step select thevpc networkinstead of the EC2-Classic.
After getting through the following steps, create the cluster. If the cluster has been started, the private IPs and private domain names of the EC2 instances should be available.
Start a VPN server using an EC2 instance in the previously selected VPC and subnet.
Connect to the VPN from your desktop
- Check if the correct route is set up (e.g.
172.30.0.0/16)
- Check if the correct route is set up (e.g.
Enable the network traffic from the VPN to the EMR cluster
- On the EMR Cluster details page open the Master (and later the Slave) security group settings page
- At the inbound rules add a new rule and enable “All Traffic” from the VPC network (e.g.
172.30.0.0/16) - Do this setting on both the Master and Slave security groups of the EMR cluster
Setup local host file
- On the EMR Cluster details page in the Hardware section check the “EC2 Instances” and get the private IP and DNS.
- Add the hostnames (DNS) and IP addresses of the nodes to your local hosts file (e.g.
172.30.1.209 ip-172-30-1-209.ec2.local)
Configure the cluster
Using an SSH access, configure the cluster as follows. Log into the master node using thehadoopusername and private key set during the launch. Execute the following commands to create the necessary staging directories:
hadoop fs -mkdir -p /tmp/hadoop-yarn/staging/history hadoop fs -chmod -R 777 /tmp/hadoop-yarn hadoop fs -mkdir /user hadoop fs -chmod 777 /userSetup networking
If you can install RapidMiner Server into an edge node on the EMR cluster, we strongly recommend to useRadoop Proxy.As a second option, you can use SOCKS proxy to connect to your EMR cluster. See theNetworking Setupsection for information on starting a SOCKS proxy and an SSH tunnel. Please open the SSH tunnel and the SOCKS proxy. The third option is to use aVPN connection.Please initiate the VPN connection to the cluster.
Setup the connection in RapidMiner Studio
When using the SOCKS proxy, the standard SOCKS proxy connection (described inNetworking Setup) should be used with the following settings:
| Property | Value |
|---|---|
| Hadoop version | Amazon Elastic MapReduce (EMR) 4.4+ |
| NameNode Address | 10.1.2.3.) |
| Resource Manager Address | |
| Hive Server Address | localhost |
| Hive port | 1235 |
| Advanced Hadoop parameters | Key:hadoop.rpc.socket.factory.class.defaultValue: org.apache.hadoop.net.SocksSocketFactoryEnabled: yes |
| Advanced Hadoop parameters | Key:hadoop.socks.serverValue: localhost:1234Enabled: yes |
| Advanced Hadoop parameters (to avoid bugHDFS-3068when using a proxy) | Key:dfs.client.use.legacy.blockreaderValue: trueEnabled: yes |
To use Spark operators in RapidMiner Radoop, enable them by selecting the appropriateSpark Versionoption in theSpark Settings.Then provide the path to the Spark libraries:
If you have added Spark 1.x on the cluster creation page, upload the Spark assembly jar to HDFS:
hadoop fs -mkdir -p /user/spark hadoop fs -put /usr/lib/spark/lib/spark-assembly.jar /user/sparkSet
hdfs:///user/spark/spark-assembly.jarasAssembly Jar Location.For Spark 2.x versions, the best practice is to upload the compressed Spark jar files to HDFS. This can easily be done by issuing the following commands:
cd /usr/lib/spark/jars zip -r /tmp/spark.zip . hadoop fs -mkdir -p /user/spark hadoop fs -put /tmp/spark.zip /user/sparkSet
hdfs:///user/spark/spark.zipasSpark Archive path.
SelectAmazon Elastic MapReduce (EMR) 4.4+as the Hadoop version.
Set the following addresses:
- NameNode Address:
(e.g. 10.1.2.3.) - Resource Manger Address:
- Hive Server Address:
localhost
- NameNode Address:
Set the ports if necessary
- The default ports are set automatically. You can find the exact ports of the services here:Differences Introduced in 4.x.
- SetHive portto 1235 (as described inNetworking Setup)
To use Spark operators in RapidMiner Radoop, enable them by:
- Select the appropriateSpark Versionoption (should beSpark 1.6) on theSparktab.
- 如果你有添加火花在集群上创建ge, the default assembly location should not be modified (local:///usr/lib/spark/lib/spark-assembly.jar)
Add the followingAdvanced Hadoop Parameterskey-value pair (as described inNetworking Setup):
Key Value dfs.client.use.legacy.blockreadertruehadoop.rpc.socket.factory.class.defaultorg.apache.hadoop.net.SocksSocketFactoryhadoop.socks.serverlocalhost:1234
SelectAmazon Elastic MapReduce (EMR) 4.4+as the Hadoop version.
Set the following addresses to
(e.g. ip-172-30-1-209.ec2.local):- NameNode Address
- Resource Manger Address
- Hive Server Address
Set the ports if necessary
- The default ports are set automatically. You can find the exact ports of the services here:Differences Introduced in 4.x.
To use Spark operators in RapidMiner Radoop, enable them by:
- Select the appropriateSpark Versionoption (it should beSpark 1.6) in theSpark Settings.
Upload the Spark assembly jar to HDFS:
hadoop fs -mkdir -p /user/spark hadoop fs -put /usr/lib/spark/lib/spark-assembly.jar /user/spark
Set
hdfs:///user/spark/spark-assembly.jarasAssembly Jar Location.Add the followingAdvanced Hadoop Parameterskey-value pair:
Key Value dfs.client.use.legacy.blockreadertrue
Radoop supports MapR 5.x/6.x for both RapidMiner Studio and RapidMiner Server. Note that MapR support on Serverrequires RapidMiner Server version 8.1 or later.
设置集群机器
- 确保DNS和反向DNS解析工作s on all of the cluster machines even if it is a single node cluster. To achieve such you might as well setup a DNS service or manually edit the
/etc/hostsfile on each node.
Setting up client machine
Studio and Server Job Agents must be running on host machines with MapR 5.x or 6.x client installed and connected.
- Depending on the MapR cluster version user will need to follow instructions for installing eitherMapR 5.x Clientor theMapR 6.x Client.Make sure to pick the version corresponding to the cluster.
- Double check the content of your
${MAPR_HOME}/conf/mapr-cluster.conffile. It should contain addresses reachable from the client machine. - SetMAPR_HOMEsystem environment variable properly (required on Windows, if not set on OS X or Linux will default to
/opt/mapr). - Double check thatMAPR_SUBNETSsystem environment variable contains the internal subnet of the MapR cluster.
- User setup for insecure clusters
- On OS X or Linux insecure configurations make sure that the client’s user is available on all of the cluster nodes. It can be done on cluster side by creating a new user with an UID which matches the client side. This can be achieved by using the
adduserunix command. - On Windows, edit
${MAPR_HOME}/hadoop/hadoop-x.y.z/etc/hadoop/core-site.xmlto configure the UID, GID and user name of the cluster user that will be used to access the cluster, seeConfiguring MapR Client User on Windows.Setting the spoofed user information is also required for MapR client version 6.0.
- On OS X or Linux insecure configurations make sure that the client’s user is available on all of the cluster nodes. It can be done on cluster side by creating a new user with an UID which matches the client side. This can be achieved by using the
To confirm the client machine is connected, user should be able to perform the following command and get back a valid result. Acquiring a ticket via
maprloginmay be required before running the command in case of a secure cluster.${MAPR_HOME}/hadoop/hadoop-2.7.0/bin/hadoop fs -ls /
If your HiveServer2 instance is secured by MapR Security, you need to do additional setup for Hive access. If it is not, this step can be skipped. Copy the jars according to theMapR JDBC Connections docsto a common directory on the host machine. These jars should be available to be copied by from the MapR 5.x/6.x cluster machine with Hive installed typically in the
${MAPR_HOME}/hive/hive-directory. See an example list below. Note that the files may differ on your environment./lib
| File name |
|---|
| hive-exec-2.1.1-mapr- |
| hive-jdbc-2.1.1-mapr- |
| hive-metastore-2.1.1-mapr- |
| hive-service-2.1.1-mapr- |
| hive-shims-2.1.1-mapr- |
| httpclient-4.4.jar |
| httpcore-4.4.jar |
| libfb303-0.9.3.jar |
| libthrift-0.9.3.jar |
| log4j-1.2.17.jar |
| In the case of MapR 6.x you may also need: |
| log4j-api-2.4.1.jar |
| log4j-core-2.4.1.jar |
Radoop Connection Setup
Note that in case of a secure cluster, a MapR ticket must always be available when connecting to a secure cluster via Radoop. Refer tomaprlogincommand documentation for further info. You must enter accessible hostnames for all server addresses (eg:Hive Address).
Click on![]() New Connectionbutton and choose
New Connectionbutton and choose![]() Add Connection Manually
Add Connection Manually
Global tab
Choose eitherMapR 5.xorMapR 6.xfor theHadoop version.
- Please verify theMapR Client HomeandMapR Subnetsas they are displayed on the dialog as taken from the System environment.
Select or Enter the MapR Cluster name in theMapR cluster.This pull down is developed from the
${MAPR_HOME}/conf/mapr-clusters.conffile. If cluster name is not listed here chances are that MapR client wasn’t properly setup in the Setting up client machine section.If the Hadoop instance is secured by MapR Security selectEnable MapR Security.
Hadoop tab
EnterResource Manager AddressandJobHistory Server Addressfields.
Review default port settings inJobHistory Server Portfield.
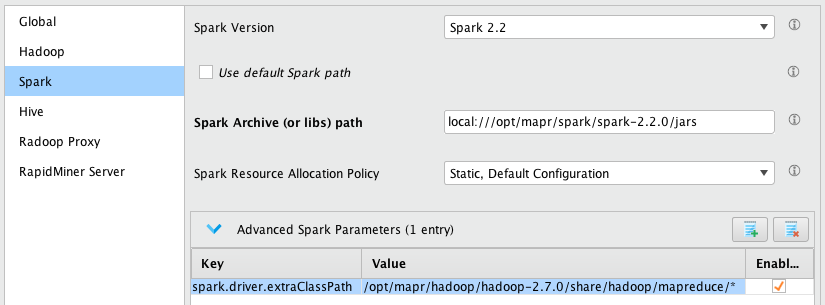
Spark tab
Select theSpark Versionaccording to the installed Spark version on the cluster. If none is installed selectNone.For more information seeInstall Spark on Yarn in MapR documentationfor cluster installation instructions.
You may eitherUse default Spark pathor by unchecking it provide the actual path by editing theSpark Archive (or libs) pathtextfield.
- Based on the selectedHadoop version,Spark Archive (or libs) pathfield is defaulted to:
- MapR 5.x –
本地:/ / / opt / mapr /火花/ spark-2.1.0 / jar - MapR 6.x –
local:///opt/mapr/spark/spark-2.2.0/jars
- MapR 5.x –
- The path must be accessible on the cluster and contain the spark artifacts.
- Based on the selectedHadoop version,Spark Archive (or libs) pathfield is defaulted to:
ProvideSpark Resource Allocation Policyaccording to your Spark setup on the cluster.
- Spark Resource Allocation Policyis defaulted toDynamic Resource Allocation.If the cluster is not configured for this, Spark test will time out and log entries of
InvalidAuxServiceException: The auxService:spark_shuffle does not existwill appear in the logs for the corresponding Spark job. In this case, either change cluster to enableDynamic Resource AllocationseeMapR - Enabling Dynamic Allocation in Apache Sparkor change to differentResource Allocation Policyon the Radoop connection (e.g. toStatic, Default Configuration).
- Spark Resource Allocation Policyis defaulted toDynamic Resource Allocation.If the cluster is not configured for this, Spark test will time out and log entries of
On Windows, add the followingAdvanced Spark Parametersentry. Here we assume that the$MAPR_HOMEon the cluster is
/opt/mapr, please change the value if this is not the case.Key Value spark.driver.extraClassPath/opt/mapr/hadoop/hadoop-2.7.0/share/hadoop/mapreduce/*At this point Spark settings may look like this.

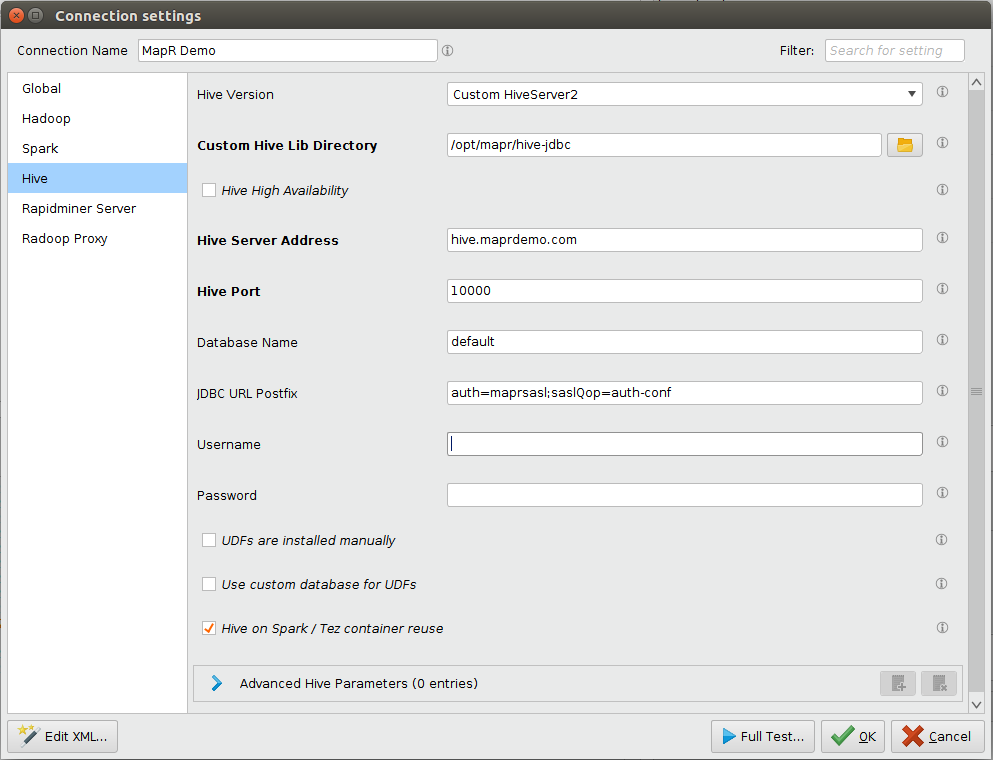
Hive tab
- Depending on security setup of Hive
- IfMapR securityis not enabled
- ForHive VersionselectHiveServer2 (Hive 0.13 or newer)
- If your HiveServer2 instance is secured byMapR Security
- ForHive VersionselectCustom HiveServer2
- InCustom Hive Lib Directoryselect the directory where jars were copied to in step 2 ofSetting up client machinesection.
- ForJDBC URL Postfixappend
auth=maprsasl;saslQop=auth-confto the textfield. If Hive server was setup with SSL then seeHive SSL Setup in Notes
- Additionally if your HiveServer2 instance is secured with SSL it will require a truststore and an optional truststore password. For this user need to adjust theJDBC URL Postfixconnection field.
- If truststore is not passed into the running JVM, user will need to append
ssl=true;sslTrustStore=;sslTrustStorePassword= - If the truststore is known by the JVM, user will only need to append
ssl=true.Truststores can be installed to the the JVM either by- Installing trusted MapR certificates into the default Java Keystore.
- Including
-Djavax.net.ssl.trustStore=to the Rapidminer Studio/Server JVM startup command.-Djavax.net.ssl.trustStorePassword=
- If truststore is not passed into the running JVM, user will need to append
- IfMapR securityis not enabled
Enter and verifyHive AddressandHive Portfields.
Enter your login credentials in theHive UsernameandHive Passwordfields. ProvidedHive Usernamemust be an existing identity on the cluster. Please note depending on cluster setup these fields can be blank.
At this point Hive settings may look like this.

After competing the setup on all of the tabs mentioned aboveQuick TestandFull Testof the newly created connection should pass without errors.
Notes on configuring user impersonation on Server
For RapidMiner Server, user impersonation makes it possible to act as different users on cluster. The user will always be the actual RapidMiner Server user authenticated by Server. The Server users allowed to access the MapR cluster must therefore exist on the cluster as well.
Note that because the Windows MapR client does not support user impersonation, connecting from RapidMiner Server installed on a Windows machine to a MapR cluster with multiple users is not currently possible.
Follow theinstructions of the Radoop on Server guideto setup the Radoop connections.
Acquire a long-lived MapR ticket that can impersonate other users on all Job Agent hosts. The following commands are just examples, please refer to MapR documentation for more info. Note that you have to make sure that the Job Agents see theMAPR_TICKETFILE_LOCATIONenvironment variable (you may need to modify their startup script for that). Set the file permissions for the generated ticket properly, so that it cannot be accessed by unauthorized users. You may also want to adjust related settings, seesettings related to resolving usernames.
maprlogin password maprlogin generateticket -type servicewithimpersonation -out /var/tmp/impersonation_ticket -duration 30:0:0 -renewal 90:0:0 export MAPR_TICKETFILE_LOCATION=/var/tmp/impersonation_ticket
Connecting to an IBM Open Platform (IOP) cluster with default settings usually works without any special setting on theConnection Settingsdialog. SelectIBM Open Platform 4.1+asHadoop version, and provide the appropriate address fields. If the SQL Standard Based Hive Authorization is enabled for your cluster or any unexpected error occurs, please refer to theHortonworks Data Platformdescription.